


Windows 10 comes with features that users can't disable the automatic update like windows 7 or windows 8. for this issue we are having two solutions.
One is, Automatic update can be stopped by disabling windows update services.
and 2nd one is, update can be stopped using group policy editor setting and registry setting.
Group policy editor setting is not applicable for Windows 10 Home, for this Windows 10 Home user can only able to disable windows update service in services.msc.
> disabling windows update service:
Press windows key + R, Run window will open, in that window type services.msc,
search for windows update in services window, right click > properties, and stop the service and then in startup type drop down menu select disabled and OK.

> disabling windows update using gpedit.msc an regedit:
Press windows key + R, Run window will open, in that window type gpedit.msc.
Local group policy editor window will open, in that window go for this path Computer Configuration -> Administrative Templates -> Windows Components -> Windows Update
and and in right side pane you will find the setting called configure automatic update.

Double click on configure automatic update setting, a new window will open for this menu, there you will find 3 options Not configured, Enabled & disabled. select Disabled and apply and OK.

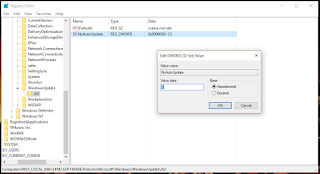
Now again press windows key + R, Run window will open, in that window type regedit, registry editor window will open, and go through this path [HKEY_LOCAL_MACHINE\SOFTWARE\Policies\Microsoft\Windows\WindowsUpdate\AU.
In right side make the value as 1 for NoAutoUpdate key.

ThatZ it, now Automatic Windows Update setting is stopped.
[Note: the registry key Windows update is only appear if you make gpedit setting for windows update as disabled, if it is not configured then you will not find the registry key for Windows Update.]
No comments:
Post a Comment